Giao diện - Tkinter - Menu


Tkinter Menu
Summary: in this tutorial, you’ll learn how to create a Tkinter menu bar, add menus to the menu bar, and add menu items to each menu.
When an application contains a lot of functions, you need to use menus to organize them for easier navigation.
Typically, you use a menu to group closely related operations. For example, you can find the File menu in most text editors.
Tkinter natively supports menus. It displays menus with the look-and-feel of the target platform that the program runs e.g., Windows, macOS, and Linux.
Creating a simple menu
First, create a root window and set its title to 'Menu Demo':
root = tk.Tk() root.title('Menu Demo')
Code language: Python (python)
Second, create a menu bar and assign it to the menu option of the root window:
menubar = Menu(root) root.config(menu=menubar)
Code language: Python (python)
Note that each top-level window can only have only one menu bar.
Third, create a File menu whose container is the menubar:
file_menu = Menu(menubar)
Code language: Python (python)
Fourth, add a menu item to the file_menu:
file_menu.add_command( label='Exit', command=root.destroy, )
Code language: Python (python)
In this example, the label of the menu item is Exit.
When you click the Exit menu item, Python will call the root.destroy() method automatically to close the root window.
Finally, add the File menu to the menubar:
menubar.add_cascade( label="File", menu=file_menu, underline=0 )
Code language: Python (python)
The underline option allows you to create a keyboard shortcut. It specifies the character position that should be underlined.
Note that the position starts from zero. In this example, we specify it as the first character which is F. And you can select it by using the Alt+F keyboard shortcut.
Put it all together:
import tkinter as tk from tkinter import Menu # root window root = tk.Tk() root.title('Menu Demo') # create a menubar menubar = Menu(root) root.config(menu=menubar) # create a menu file_menu = Menu(menubar) # add a menu item to the menu file_menu.add_command( label='Exit', command=root.destroy ) # add the File menu to the menubar menubar.add_cascade( label="File", menu=file_menu ) root.mainloop()
Code language: Python (python)
Output:
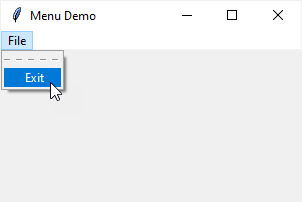
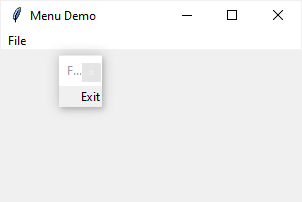
By default, Tkinter adds a dashed line before the first menu item. When you click the dashed line, the main window will detach the menu from it like this:
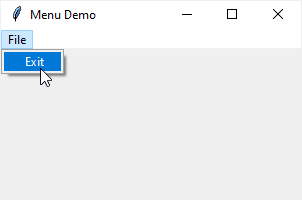
To remove the dashed line, you can set the tearoff property of the menu to False:
file_menu = Menu(menubar, tearoff=False)
Code language: Python (python)
Output:
Creating a more complex menu
The following program illustrates how to create a menu bar, add the File and Help menus to the menu bar. Also, it adds multiple menu items to these menus:
from tkinter import Tk, Frame, Menu # root window root = Tk() root.geometry('320x150') root.title('Menu Demo') # create a menubar menubar = Menu(root) root.config(menu=menubar) # create the file_menu file_menu = Menu( menubar, tearoff=0 ) # add menu items to the File menu file_menu.add_command(label='New') file_menu.add_command(label='Open...') file_menu.add_command(label='Close') file_menu.add_separator() # add Exit menu item file_menu.add_command( label='Exit', command=root.destroy ) # add the File menu to the menubar menubar.add_cascade( label="File", menu=file_menu ) # create the Help menu help_menu = Menu( menubar, tearoff=0 ) help_menu.add_command(label='Welcome') help_menu.add_command(label='About...') # add the Help menu to the menubar menubar.add_cascade( label="Help", menu=help_menu ) root.mainloop()
Code language: Python (python)
Output:
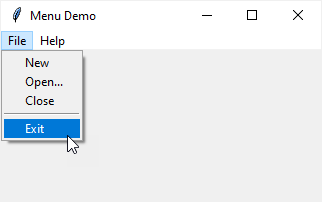
The only new statement in this program is to use the add_separator() method to add a separator to the menu.
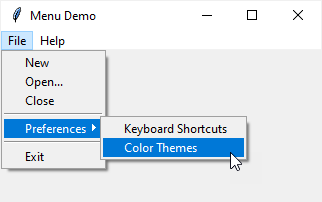
Adding a submenu
The following program adds the menu item Preferences to the File menu and create a submenu that links the new menu item:
from tkinter import Tk, Menu # root window root = Tk() root.geometry('320x150') root.title('Menu Demo') # create a menubar menubar = Menu(root) root.config(menu=menubar) # create the file_menu file_menu = Menu( menubar, tearoff=0 ) # add menu items to the File menu file_menu.add_command(label='New') file_menu.add_command(label='Open...') file_menu.add_command(label='Close') file_menu.add_separator() # add a submenu sub_menu = Menu(file_menu, tearoff=0) sub_menu.add_command(label='Keyboard Shortcuts') sub_menu.add_command(label='Color Themes') # add the File menu to the menubar file_menu.add_cascade( label="Preferences", menu=sub_menu ) # add Exit menu item file_menu.add_separator() file_menu.add_command( label='Exit', command=root.destroy ) menubar.add_cascade( label="File", menu=file_menu, underline=0 ) # create the Help menu help_menu = Menu( menubar, tearoff=0 ) help_menu.add_command(label='Welcome') help_menu.add_command(label='About...') # add the Help menu to the menubar menubar.add_cascade( label="Help", menu=help_menu, underline=0 ) root.mainloop()
Code language: Python (python)
Output:
How it works.
The following code adds a submenu to File menu and links the submenu to Preferences menu item:
# add a submenu sub_menu = Menu(file_menu, tearoff=0) sub_menu.add_command(label='Keyboard Shortcuts') sub_menu.add_command(label='Color Themes') # add the File menu to the menubar file_menu.add_cascade( label="Preferences", menu=sub_menu )
Code language: Python (python)
Summary
- Use
Menu()to create a new menu, - Use
menu.add_command()method to add a menu item to the menu. - Use
menubar.add_cascade(menu_title, menu)to add amenuto themenubar. - Use
menu.add(submenu_title, submenu)to add a submenu to themenu.